Turning Old Scraps into a Gorgeous String Quilt
- Julie Brown
- Nov 26, 2022
- 4 min read
Updated: Dec 9, 2022
From strings and scraps to a quilt! Create your own pattern or use mine, gather your scraps and start sewing your own string quilt. This is an easy pattern that you can pick up anytime and sew on. Save all those strings that you might otherwise throw away.
Hi everyone,
I’m tired of my piles of fabric scraps. They take up too much room, and they just get in the way of having a nice, clean organized space. But I paid good money for all this fabric, and I can’t bring myself to throw any of it away.
But then I thought: it’s time to sort my piles and use these scraps to make my string quilt, I have always wanted to make a string quilt.
· I’ll add some variety to my quilting
· I’ll have a way to use up all the scraps I have now
· I’ll have a way to use any scraps in the future
· And check a quilt off my bucket list
Finally, my scrap hoarding is going to pay off!
If you’re not familiar, a string quilt is made up of all your scraps or strings leftover from making quilt blocks. The extra material is sewn into blocks then the blocks are sewn together to make your top.

And what makes this great for using up scraps is that you use virtually all size strings, all colors and patterns and solids (yes, even that "ugly" fabric, throw it in), very little planning per-se, no sorting – grab a bag of scraps, your foundation block, and sew!
All you new quilters out there maybe saying to yourself, if only I had enough scraps.....well, no worries, quilt shops usually have scrap bags for sale at very reasonable prices. The shops that I'm familiar with usually don't have them displayed. You'll have to ask if scrap bags are available for purchase.
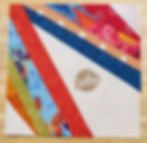
For my first try at a string quilt, the only thing I’ve planned ahead is the star pattern, the star color, and the corner accent color. I originally wanted to use this fabric,

but now I’ve decided to leave them in the foundation fabric. I’ll leave that fabric for another day. Plus, this fabric mixed with all these scraps might look too busy. Having the star and corners white will give a place for your eyes to rest.
I need to decide on the type of foundation for my blocks, and I’ve decided to use up some white fabric that I've had on-hand for way too long. I will trace my pattern on with a water-soluble pen. I’m using a water-soluble pen because my marks will not be permanent and will come out with water.
I could use a disappearing pen if were to use the foundation squares right away. The marks usually disappear within 24 hours depending on humidity.
If you are using a water-soluble pen, remember to remove the marks before ironing or they will be permanent. It’s also a good idea to test the pen to make sure it will come out before marking all the blocks.
My foundation blocks are cut out, marked and ready to go.

I spent some time cutting up some of the larger pieces that I had in my scrap/string bin. Some where pretty large. I found that large pieces, especially longer ones that I missed, ended up a tangled mess. This step I will definitely not skimp on in the future.

In my string and scrap bin I included left-over blocks and incorporated them into my blocks. I am so so glad that I did because I really liked the look it adds, and will definitely continue to add orphan blocks and scrap pieces from cutting out blocks.


Using orphan blocks or left-over pieces after cutting blocks in this String Quilt looks great!
Now, I want my strings mixed up because the more mixed and variety in the fabrics the more scrappy, random, and even the look. If they are not mixed well, then you'll end up with the same fabrics bunched into a few blocks and not spread throughout the blocks and quilt. The look in my opinion is blotchy and not random or as pretty.

Now that my strings are mixed up, I can start sewing using a ¼-inch seam allowance when possible but I’ll go down to 1/8-inch if needed.

Then once that section is complete, I’ll move onto the next section where I’ll sew all that section blocks one right after another without breaking the thread.

I'll keep doing this until my blocks are sewn.

The blocks are a mess before they are squared up! When I got to this point I was pretty nervous, wondering if I was going to like this. Keep an open mind! Squaring up the blocks makes a huge huge difference!
Time to square up my blocks because the strings are hanging over the edges of my block. I want the blocks to have a clean edge when I sew them together.

The blocks will have clean and straight edges after squaring up. This will ensure a squared block and squared quilt top. Wow, what a difference!
If I was going to create my top, I would now sew 4 together to create 1 large block. I would chain piece these also.

When that’s done, I would sew all these blocks together into my quilt top.

Originally, I was going to finish this as a small quilt. I’ve decided to continue block making until this is a queen size quilt.


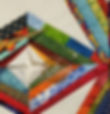
I have my foundation blocks cut, marked, and stored in my string bin so I’m ready to sew. A few things I really like about this pattern: the first is the 3D appearance. This is created I think because of the floating feel of the stars which is created because they are inset and the corner white triangles that create the square. The other thing I really like is the border that is created – all this from this 1 little block. Amazing!

I’ve used up a ton of scraps. And cleaned up my area - woohoo - what a wonderful feeling!
I don’t feel guilty about collecting future scraps, and I’ve added some variety and fun to my quilting.
I used up scraps using a variation of this star pattern in the butterfly quilt.
I hope that you try this pattern and have as much fun as I have had working on this String Quilt.
Thank you for joining me.
Julie


